Natural Purples on Silk – Discovering an Early Modern Palette
By Kirsi Mantua-Kommonen
In 2022-23, the ERC-Refashioning project carried out a historical velvet waving experiment, in collaboration with the Fashion History Lab at Aalto University, Finland. The purpose of the experiment was to test what a high-quality purple silk velvet might have looked like in the early modern period and to record the processes and experiences of both the weaving and dyeing. The experiment was designed and carried out by Professor Paula Hohti, myself, and the weaver and MA student Elise Piquemal. My role in this experiment was to dye the silk samples in various shades of purpl.
The Dye Process
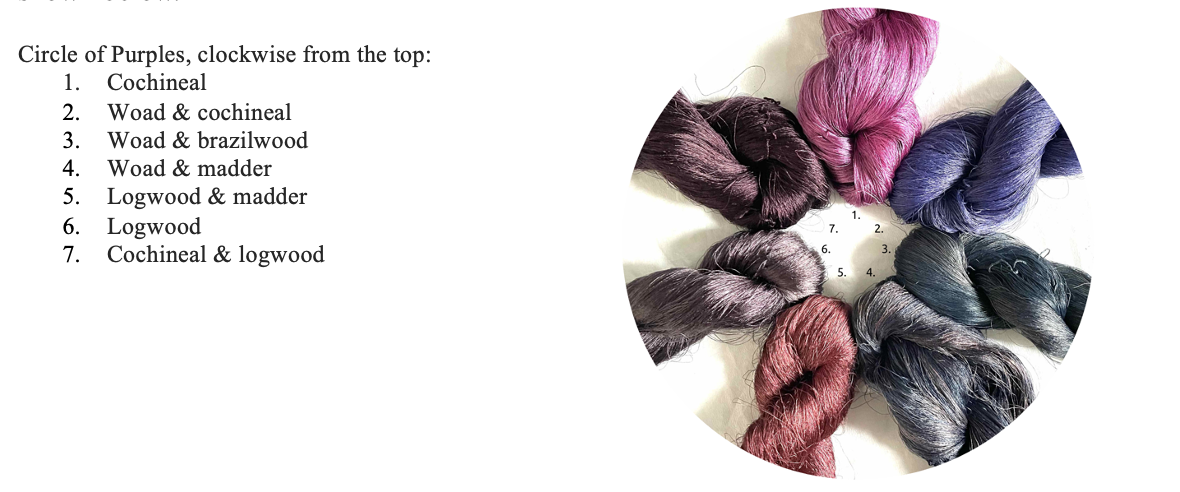
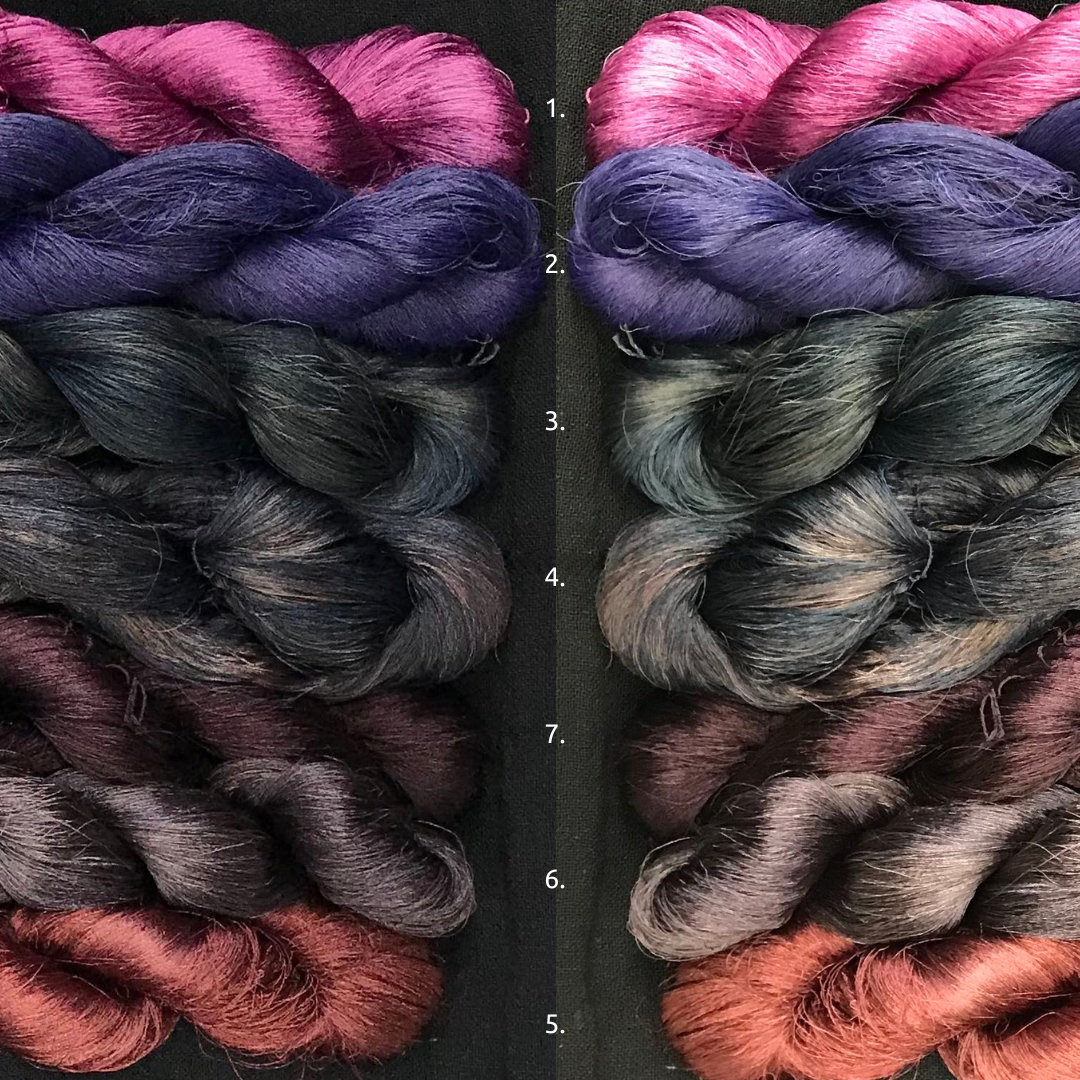
For the purposes of this experiment, we created a palette of exquisite purples using natural dyes available in Early Modern Europe. Furthermore, we had the luxury of working with the highest quality mulberry silk grown and produced locally in France. We selected the following natural dyes: carmine extracted from cochineal (Dactylopius coccus), indigo blue from local woad (Isatis tinctoria L.), warm reds from brazilwood (Caesalpinia L.) and madder (Rubia tinctorum L.), and a purplish shade from logwood (Haematoxylum campechianum L.). Combining these we achieved the palette shown below.
 Next, I will briefly introduce the colours and natural dyestuffs shown in more detail.
Blue with Finnish Woad
Woad (Isatis tinctoria L.) is an indigo-producing plant that can be grown across Europe. For this reason, it was the most important source for blue for textiles in Early Modern Europe, while also imported indigo (Indigofera) was sometimes used.
The magical process of indigo dyeing is intriguing, because the colorant is not water-soluble. Therefore, it requires first making a dye vat, the colour of which is not blue, but yellow or greenish. The dye is reduced into water-soluble form, and when it is ready, the surface of the liquid seems metallic, like purple-coloured quicksilver! In the middle it has formed fluffy foam or bubbles, poetically called ‘the flower’.
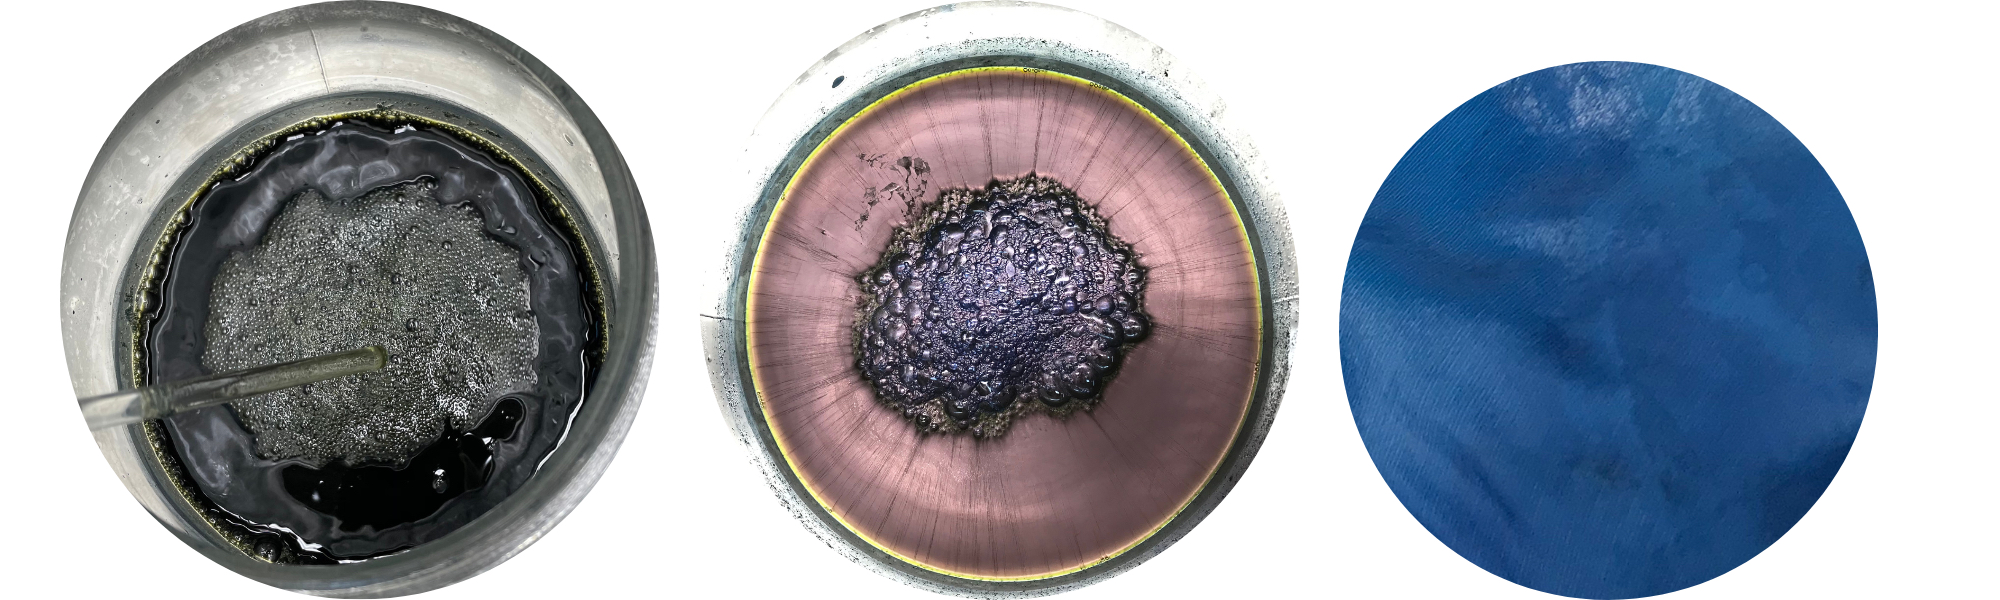
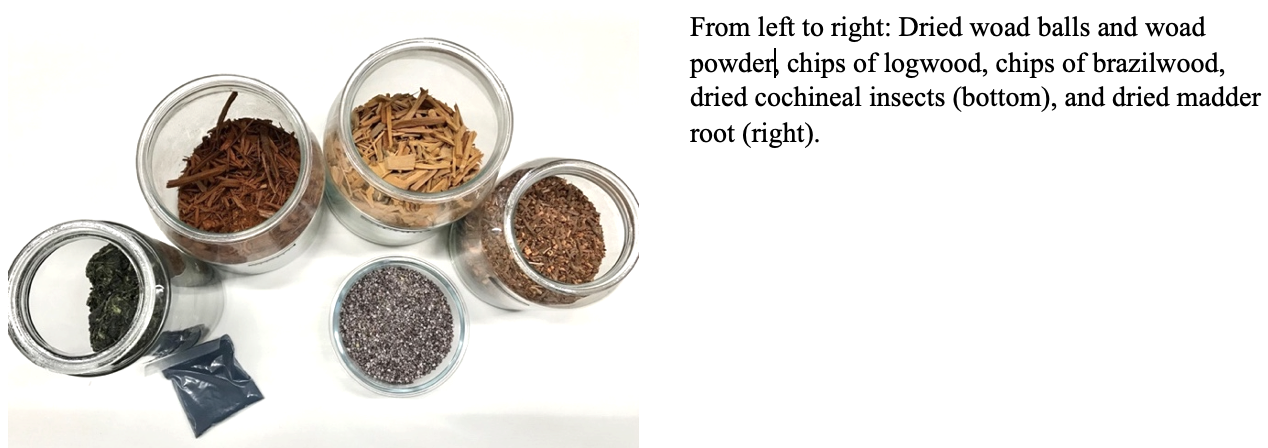
Dried woad balls. Woad powder. Indigo vat ready for dyeing.
However, getting a uniform blue on our delicate silk yarn was not easy, because the dye only fixes to the surface of the skein. We carefully dipped the yarn skeins into the solution for a few minutes. We gently moved the skeins around in the vat to facilitate an even dye result, but avoiding letting oxygen into the liquid. As the yarn was lifted from the dye vat, it was first yellow and then immediately turned green. Within only a few minutes, the colour transformed again, now into blue, right before our eyes. This process is fascinating every time!
![]()
Preparing the indigo vat. Observing the colour transformation.
On a less desirable side, the prevailing pungent odours of the fumes emitted in the process, which used to involve fermenting in urine, nowadays replaced with ammonia, are far from pleasant or harmless. This may have been one of the main reasons for the dyers’ quarters being located further away from those of the elites in Early Modern towns.
Even today, woad is an important dye plant grown in several European countries, including Finland. Woad is a biennial plant, which means it has a lifecycle of two years: On the first year, the plant germinates and grows its leaves that contain the indigo compounds, and on the second year it blooms and produces seeds, which are collected for sowing again the following year.
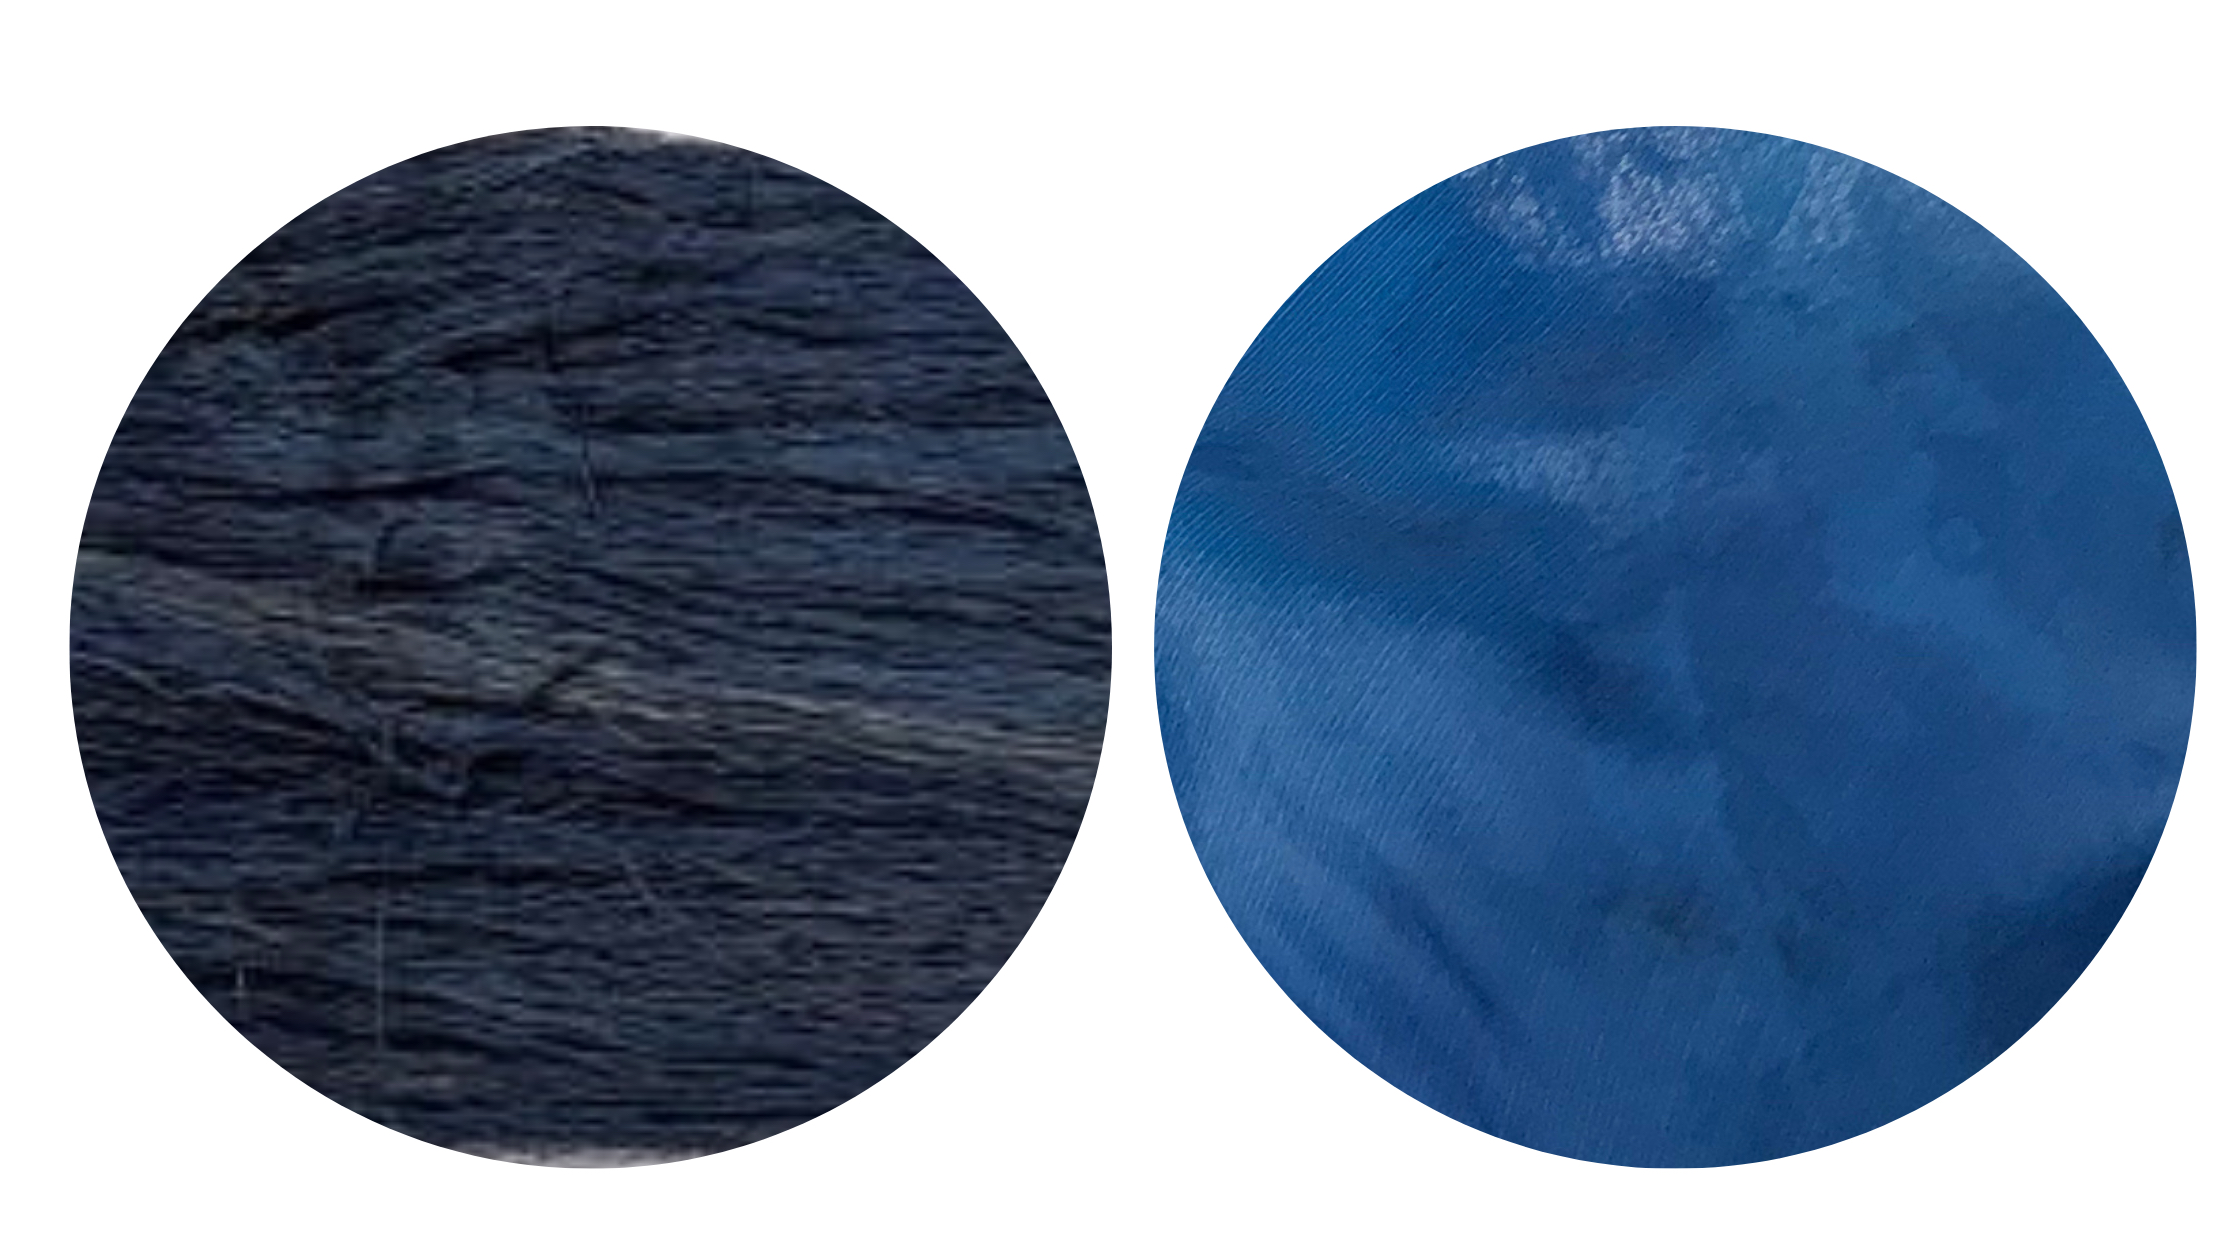
Mulberry silk yarn (left) and industrial silk fabric (right, still damp), both dyed at the same time in an indigo vat.
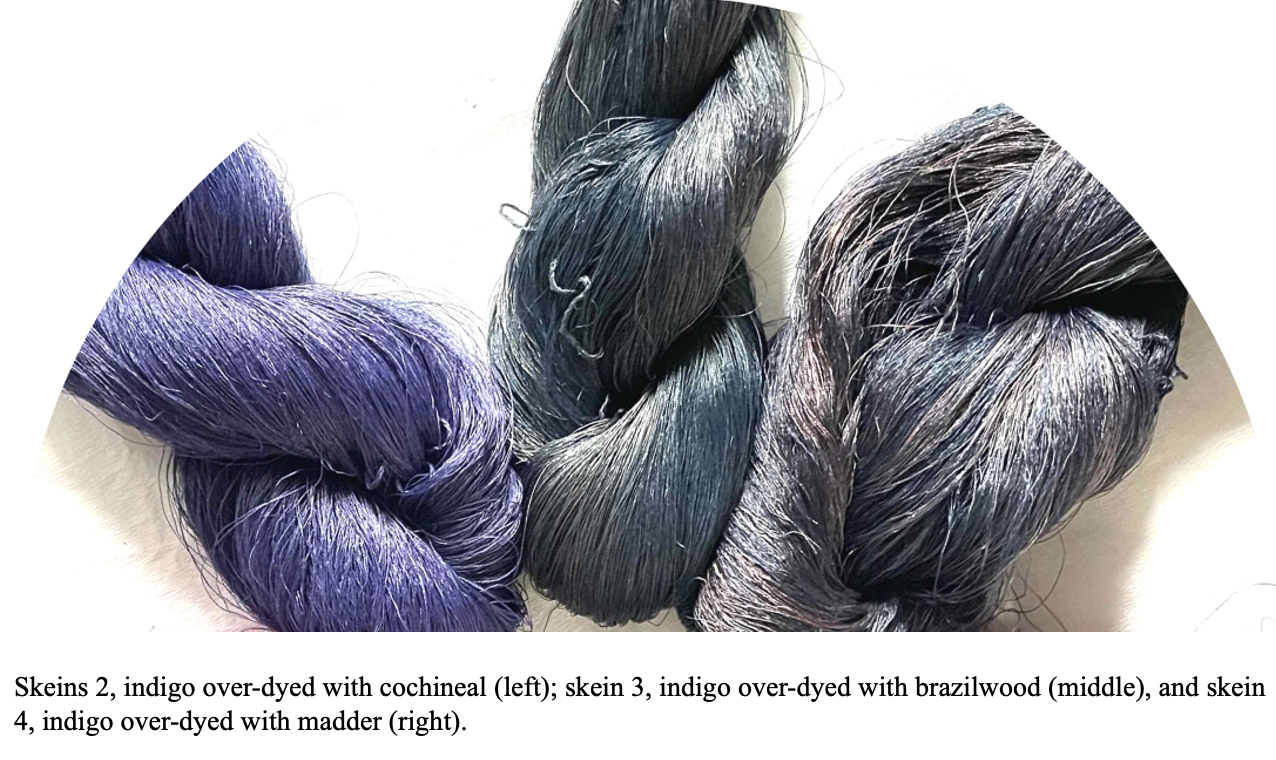
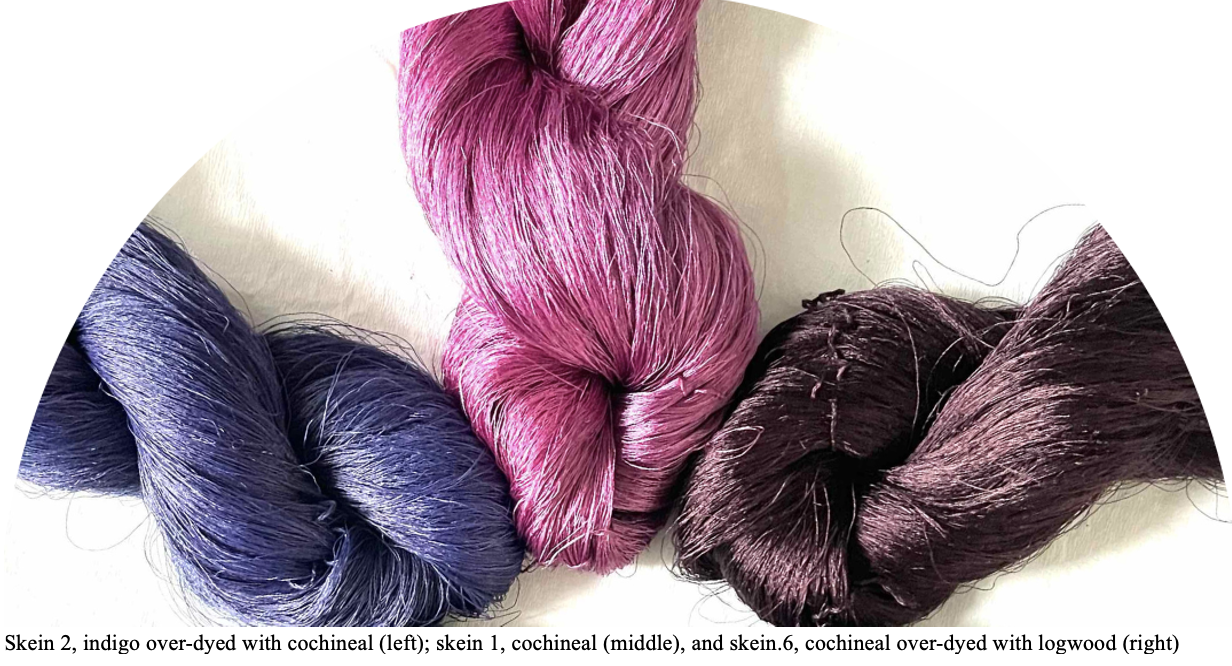
When this indigo blue was over-dyed with red dyes (details follow below), a palette of purples began to emerge
Purple with Logwood
Logwood (Haematoxylum campechianum L.) is a tree species originating from Central America, and coveted for the dye extracted from its hardwood. The beautiful purple colour it provides is not lightfast. With certain mordants no longer recommended due to their toxicity (e.g. copper and tin), it provided lustrous shades of blues, purples and reds, which were also inclined to fade. Consequently, already in Early Modern Europe its use was strictly restricted. However, it was more successfully introduced as a compound for dyeing beautiful, colourfast blacks when combined with madder and tannin, and mordanted with chromium, also still commonly used at that time. The consequent high interest towards this new dye resource meant chopping down entire forests in areas of modern day Mexico and Belize, and introducing the tree to further areas to keep up with the demand.
Certified, sustainably grown logwood may nowadays still be an option as a base for dyeing natural black. Even today, the main colour compound extracted from logwood, hematoxylin, is significant as a histochemical staining agent – it is used as a contrast agent in pathological diagnostic analysis safely applicable for all organs.
Like the following colorants in our experiment, also logwood is a so-called mordant dye. This means that the dye and fibre fix better with the help of a mordant, creating a more colourfast result. The least harmful and therefore concurrently most used mordant is alum, which we applied before dyeing.
Opening the lid of the logwood kettle during the long extraction and dyeing processes released lovely aromas of herbs, hay, and hints of sweet caramel, adding to the delight of our natural dyeing experience.
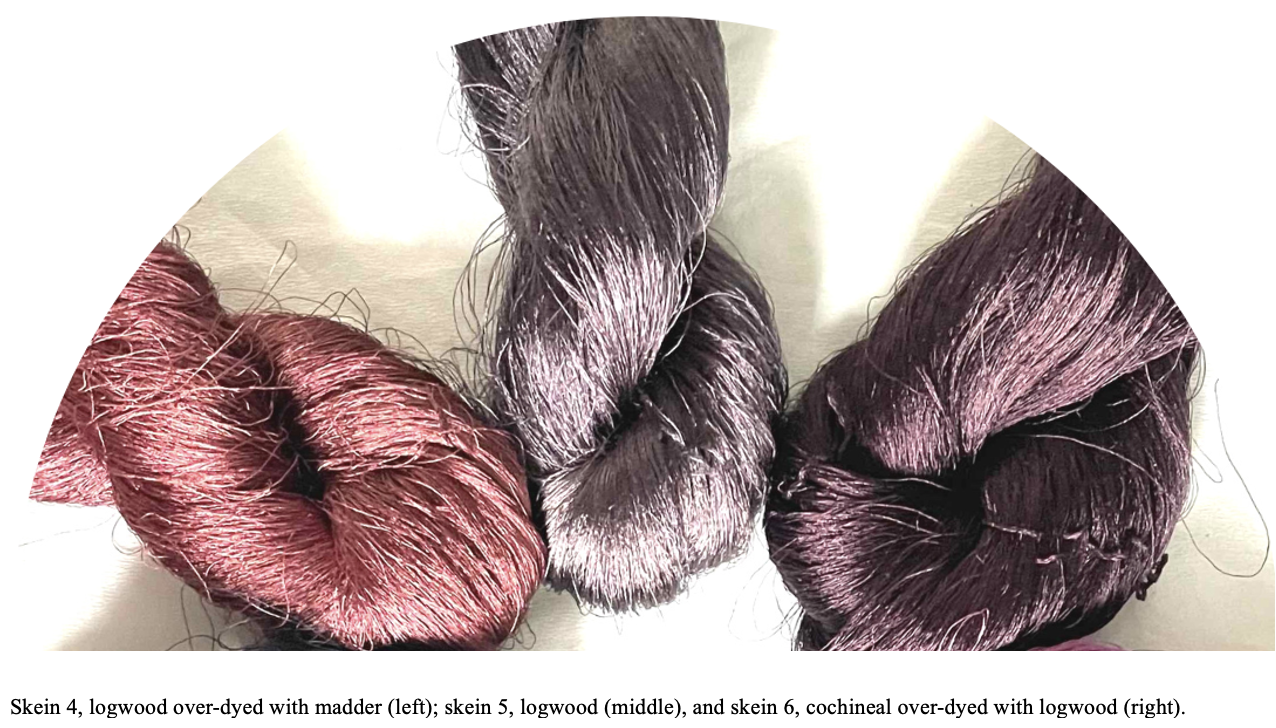
Similarly to indigo, also logwood can be combined with other dyes for purples. This even increases its colourfastness. For purples we experimented with combining logwood with madder and cochineal as depicted below.
Carmine from Cochineal
Cochineal (Dactylopius coccus) is a tiny scale insect, which feeds off the red sap of a certain species of cacti, Prickly Pear (Opuntia phaecantha), in subtropical South America. Indigenous peoples, first in Peru and later also for example Mayas and Aztecs (Mexico), had perfected the skill for cultivating cochineal. This New World dye charmed Europeans with its brilliance, unmatched by the ones previously known in Europe, and became the dye for royalty.
Nowadays, the production of this traditional survives in Peru, Mexico and other South American countries, and also on the Island of Lanzarote of the Canary Islands. There, one family continues the work of their ancestors, passed on from the era of conquistadors, who finally got to smuggle some cacti and cochineals with them and succeeded in local cultivation of this valuable dye source, with a very high dye content. This dye is used for textiles, but also for colouring food, drinks, and cosmetics, such as lipstick. Rather than saying carmine acid, the package is likely to have the code E120 – this is cochineal!
For anyone enjoying shades of hot pink, fuchsia, and carmine red, dyeing with cochineal is a treat, since such bright and bold shades are almost impossible to achieve with other natural dyes. We first ground the dried insects in a mortar to a fine powder, and then extracted the colour from it by cooking. Achieving bright pink is easy, but the heat needs to be kept quite high for the colour to fix properly with the fibre. Combined with indigo or logwood, it provides exquisite, colourfast purples.
Madder and Brazilwood Provide Warm Reds
Dyers’ madder (Rubia tinctorum L.) is a plant that produces a multitude of red dye compounds such as alizarin, purpurin, and rubiadin, in its roots. Madder is the oldest source of red dye found on historical textiles in many areas in Europe, and it is native to the Middle East and eastern Mediterranean area. Later its cultivation spread west and north as a perennial, and as an annual plant even further north.
Dyeing with madder is fascinating but, if a particular shade is aimed for, also demanding: changes in extraction and dye temperature influence the resulting red colour, ranging from yellow-oranges to reds to brownish reds. The best tones of red are achieved at temperatures below seventy degrees centigrade, and even cold-dyeing method works well with madder. Higher temperatures provide brownish tones. At first the roots extract yellow, and over the course of history many ways have been developed to “get rid of” this yellow or dye something else with it first to secure the purest possible red from this dyestuff. Even the soil and area where the plant was grown have an influence on which compounds it has produced and, consequently, on the dye result.
Brazilwood and related redwood species (Caesalpina ssp) are trees, which produce similar shades of red, as does madder. However, these dyes are not very colourfast, which is why it was often combined with other red dyes, or used for the warp or other less visible parts of the textiles. The dye from brazilwood is sensitive to changes in acidity/alkalinity, which is rather typical to the less colourfast dyes. Therefore, to support the colourfastness it would have been important to use soap with similar pH-level as that of the dye bath if the product needed to be washed, and to store the piece protected from light.
Also, similarly to logwood, very large quantities of redwood shavings are required for extracting enough dye to obtain rich colours for fibres, typically ten times the weight of fibre. Therefore, for modern day experiments it is important to check the certification of the material producer.
Dyeing with brazilwood is an enjoyable experience not only due to the beautiful reds it affords, but also because of the lovely scents for exotic flowers and fruit that seem to have followed the dye from the place of origin of these trees.
General Remarks
Many of the above dyes; cochineal, madder and brazilwood in particular, were used for purple also on their own by modifying their colour with metal mordants, copper, chromium, tin, or led. Consequently, in our experiments we did not use these, since the fine silk we worked with would likely have been damaged by these treatments. Furthermore, these substances are nowadays known to be dangerous for the dyer, the environment – due to effluent waters – and even the user of the dyed products, so their use is not recommendable if not absolutely necessary for the particular experiment. Iron mordant is less toxic, but it could also have been harmful for our delicate silk yarn.
The human eye perceives colours from natural dyes very differently in changing lighting conditions, and the reflections on silk amplify this phenomenon. The photos below show the difference between a photo taken without or with a flashlight. As candlelight would most probably have set the atmosphere for observing such materials, we can only imagine the dramatic effect these kinds of silks had for the people whose vision had not yet been polluted by synthetic dyes.
To see what these colours look when woven into velvet and how they further changed their appearance, see Elise Piquemal’s post on the weaving process in the Refashioning the Renaissance blog.
For more information on the Refashioning weaving experiment, click here.
References:
Boutrup, J., & Ellis, C. (2018). The art and science of natural dyes: principles, experiments, and results. Schiffer Publishing, Limited.
Cardon, D. (2007). Natural dyes. Sources, tradition, technology and science, 268.
Kirby, J., van Bommel, M. R., Verhecken, A., Spring, M., Vanden Berghe, I., Stege, H., & Richter, M. (2014). Natural colorants for dyeing and lake pigments: practical recipes and their historical sources. Archetype Publications Ltd in association with CHARISMA.
Rodríguez, L. C., & Niemeyer, H. M. (2001). Cochineal production: a reviving Precolumbian industry. Athena Review, 2(4), 76-78.
©Photos: Kirsi Mantua-Kommonen, Elise Piquemal/Fashion History Lab


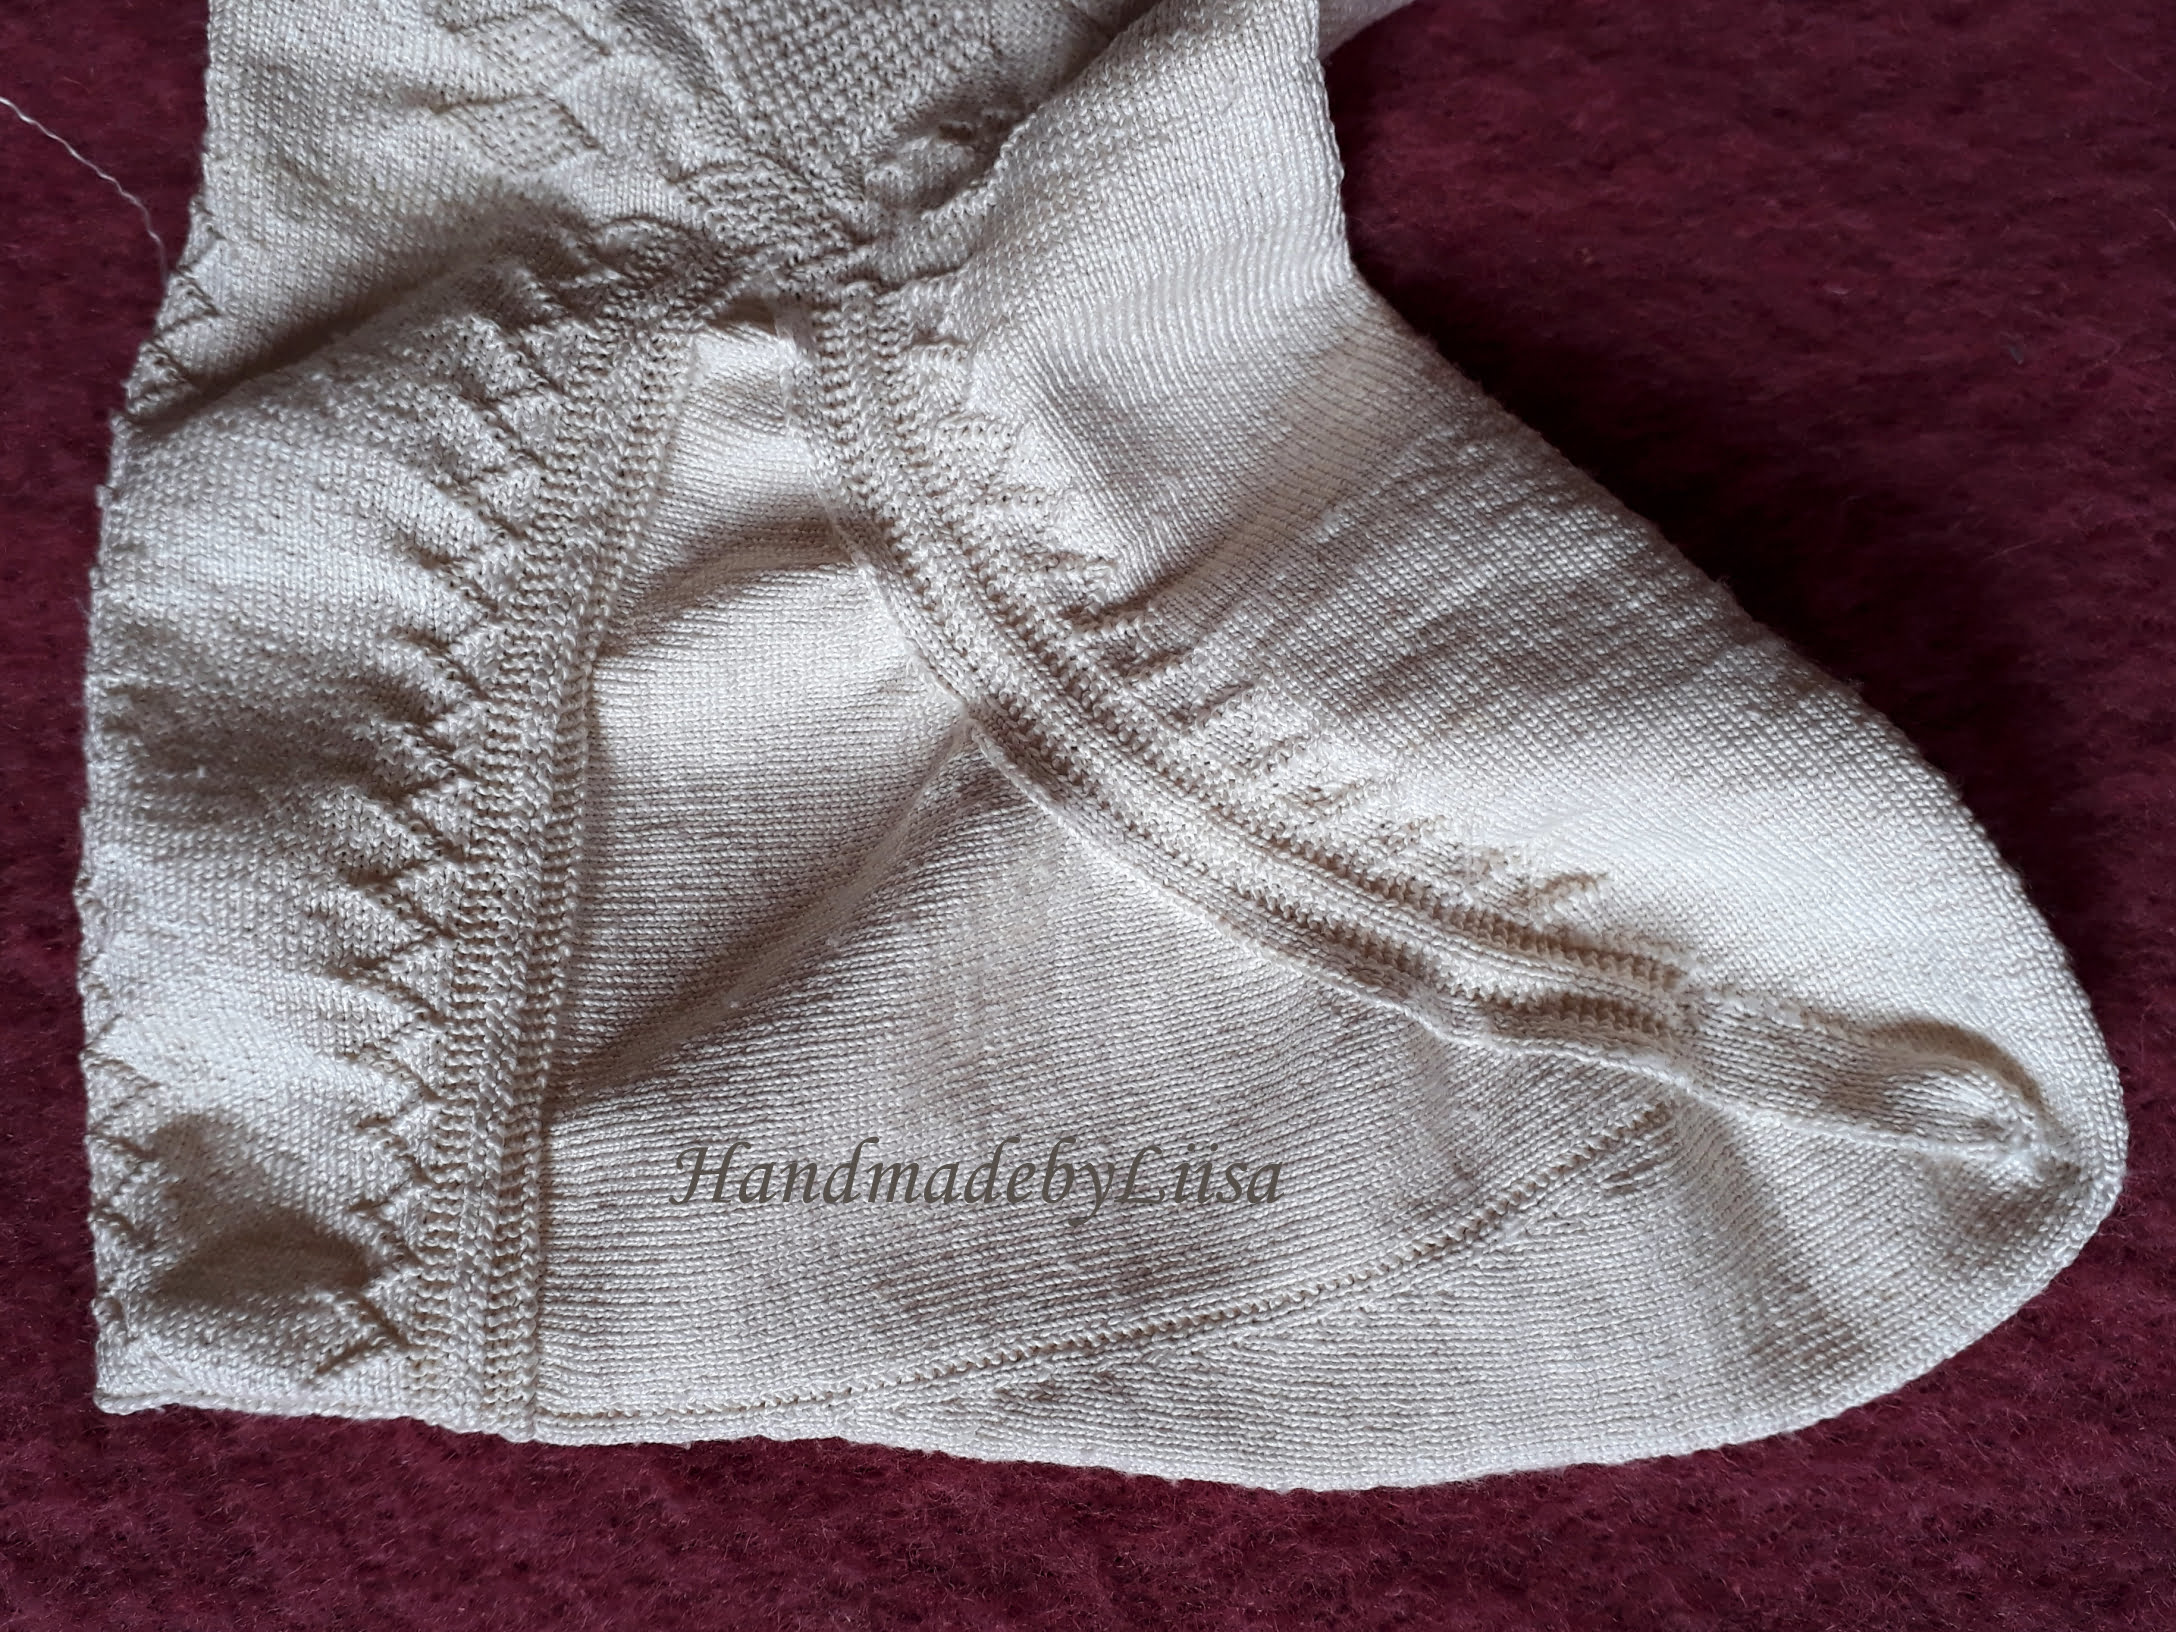
 The heel flap before it was folded and knitted together